

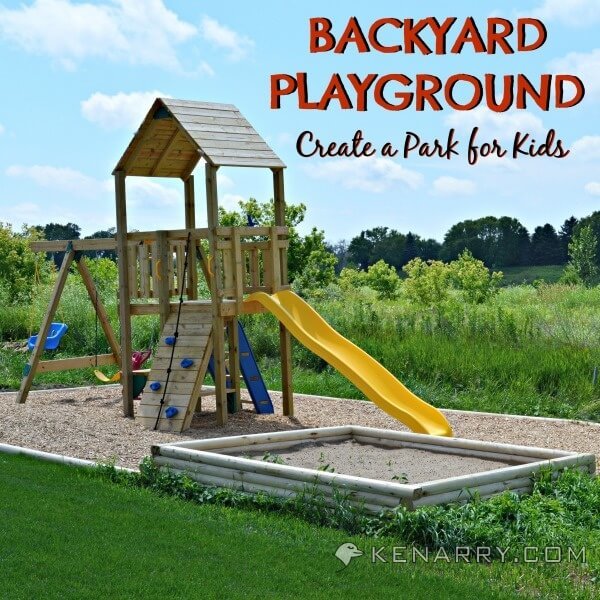
How To Build An Outdoor Play Area
Create your own DIY Backyard Playground to entertain the kids. This is an easy construction project with simple materials for a playset and large sandbox.
In what can only be described as "MASSIVE SCOPE CREEP", I've managed to turn a simple wood sandbox project into an entire backyard playground for our sons, C1 and C2. Carrie and I let our imaginations get the best of us as we schemed and dreamed of a fun and safe DIY Backyard Playground .
In the end the project was quite a bit more work than I had figured, but we're pleased with the results. I hope you enjoy walking through the project and seeing the final results of our DIY Backyard Playground!
Disclosure: This blog post containsaffiliatelinks for products or services we think you'll like. This means if you make a purchase from one of theselinks, we'll make a small commission at no additional cost to you so we can keep the great ideas for the home coming your way. All opinions expressed are our own, derived from our personal experience.
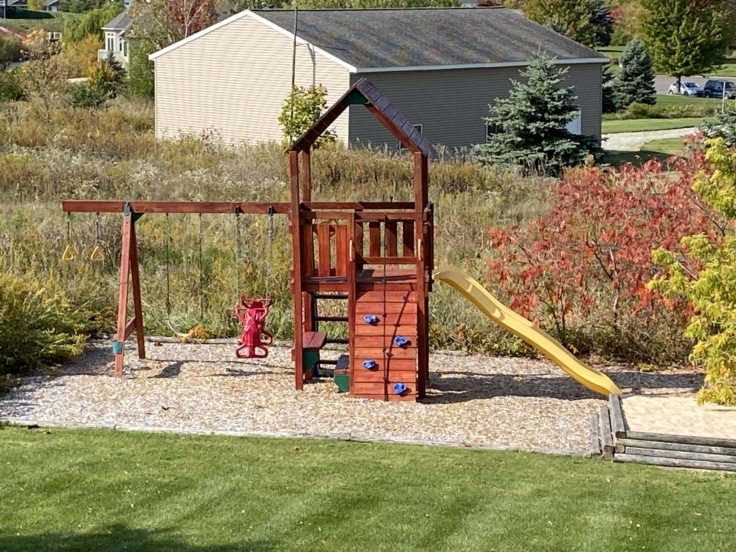
Update: How Long Does A Backyard Playground Last?
This post was originally published in 2014 and at the time of this update it is 2020. So how has the playground held up over the last 6 years?
I've been pleased with the durability of the project. The pressure treated lumber of the playset is in good condition despite my neglect. I had originally intended to stain the playset after letting the wood acclimate for a year. Life got busy and 1 year turned into 6. We finally got the project the summer of 2020 and I'm pleased with the result (I should have done this a long time ago!). We ended up going with a Behr Redwood Transparent Waterproofing Exterior Wood Finish. Behr has been our go to for painting and staining projects in recent years and they didn't disappoint this time around either! Here is a picture of our rejuvenated play set:
The only other ongoing maintenance items for our backyard play area were:
- Ongoing weeding – as you can see our playset is surrounded by weeds so it's inevitable that some will take root in the play area.
- Fresh wood chips every couple of years. After a couple of years in Michigan the ground cover starts to decay. Luckily it's a pretty easy job to spread some new chips.
Now that we've got a good coat of protection on the play set, the next item that I will have to address is the ground timbers. They are showing age and I suspect I'll need to make a decision in the next couple of years on whether to replace them or to retire the play area. For now, my kids still enjoy playing out there, but a time will come when the play set may need to find a new family.
Want to learn how to make your own? Here is how we built our own DIY Backyard Playground, along with some tips I learned the hard way.
Our Backyard Playground
When Carrie and I began discussing summer projects this winter, one item near the top of her list was a play set and sandbox for C1 and C2. It wasn't a tough sell for me as we both have fond memories of digging in sand and playing in tree forts when we were small.
At that point the project scope was pretty simple – build a simple DIY Sandbox and purchase a playset either new or used. That sounds easy enough right? Well, the first challenge I had was actually picking out a playset.
I did quite a lot of looking on Craigslist and did my typical engineer's research on brands, build quality, durability, etc. etc. After a month of investigation, I opted to go with the Playstar Powerhouse XP Silver from my local lumber yard.
Choosing the Backyard Playground Equipment
Part and lumber quality were the key drivers in my decision. I had looked at several big box stores and generally found the wood to be thin, bordering on flimsy, and the fasteners and accessories to be of suspect quality.
So I decided to suck it up and shell out a bit more money to get something that would be a fixture in our backyard for years to come. Mission accomplished! I can tell you from personal experience, this thing is heavy duty, and just plain heavy!
I'm not going to go into detail in this post on the actual build of the Playstar Powerhouse XP Silver, but will share a couple of general insights:
- The kit I purchased contained all of the hardware (swings, slide, mounting hardware, etc) along with a pile of dimensional lumber that required cutting
- Instructions, in general, were clear and easy to follow. My father-in-law came over to help and we were able to complete all cuts without issue.
- We were both amazed at how efficiently they use the lumber. The scrap pile at the end of all our cutting was ridiculously small – almost every bit of wood is used in the playset.
- The hardware was high quality and once again, assembling the cut pieces was straightforward per the directions.
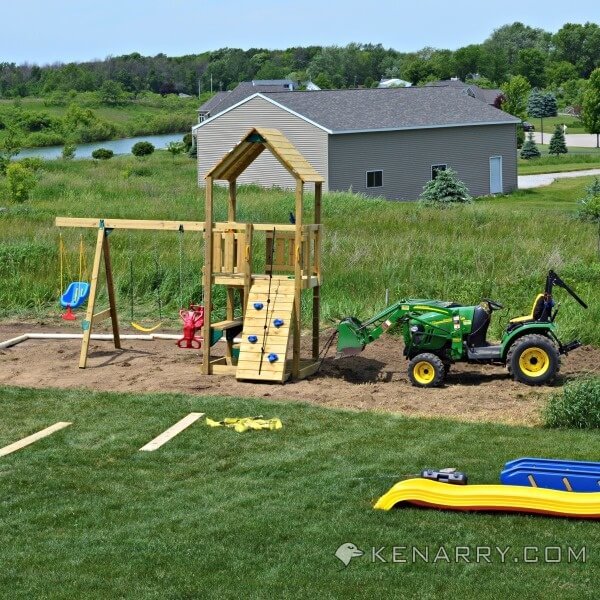
- Did I mention this thing is HEAVY? I highly recommend assembling it in final position. In my case, the scope creep got the best of me and I was forced to move the playset with my buddy who had come over to help with the sandbox. This required a tractor with a loader and a tow strap! If I didn't have the tractor I would have had to call in favors from 5 or 6 of my closest friends.
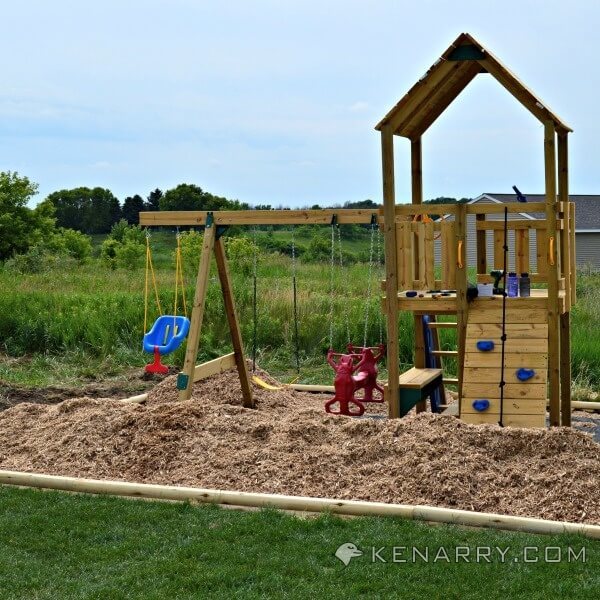
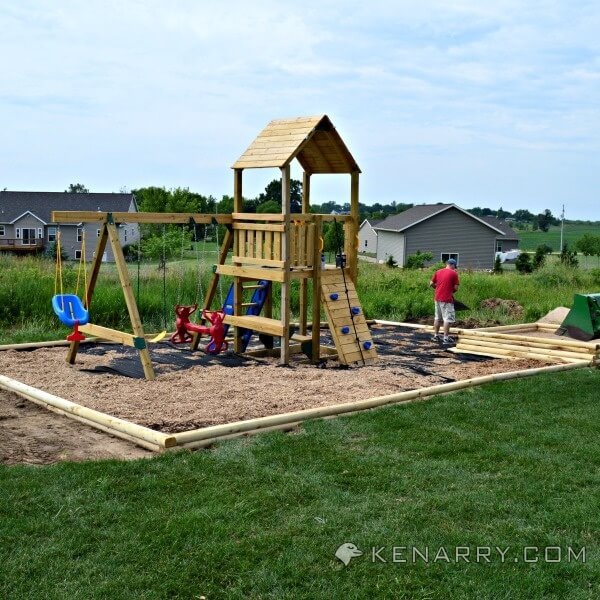
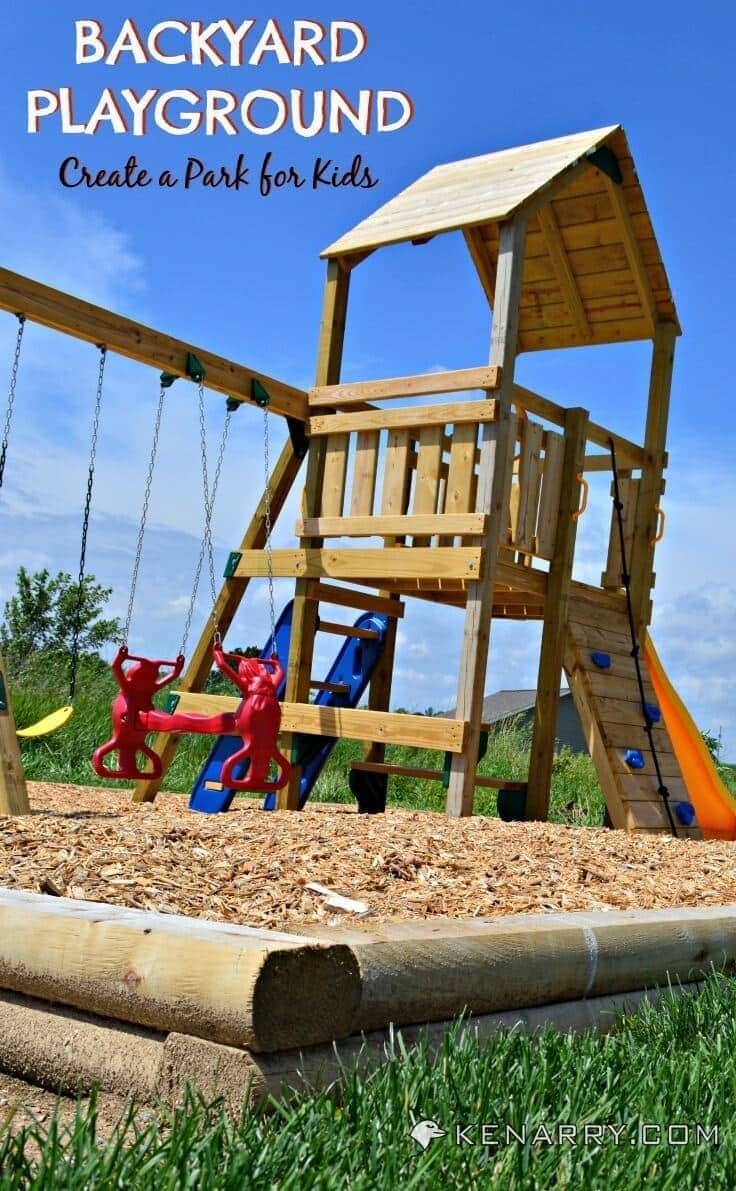
So that's the playset – which is certainly the jewel in my DIY backyard playground for kids. Below is a picture of the finished playset.
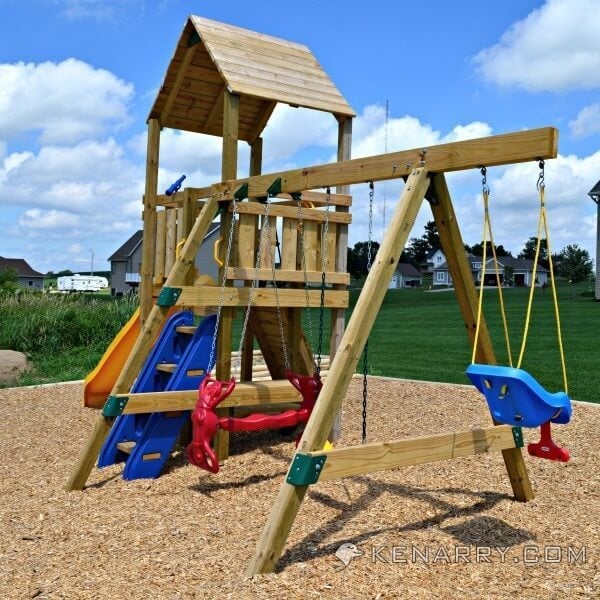
With the Playstar Powerhouse XP Silver chosen for our DIY backyard playground, it's now time to start creating the park!
How to Make the DIY Backyard Playground
Here's everything you need to know to your own playground. It took some time, but it was worth it.
What You Need:
- Landscape Timbers – 8 feet long each – your number will depend on the size of the playground you intend to build and the depth of the playground material.
- Hammer
- Framing Square
- 7″ Galvanized Pole Barn Nails – I recommend 2 nails per ground contact board.
- 5″ Exterior Wood Screws – I recommend a T25 Torx head. You'll pay a bit more, but they will save a lot of strip out frustration. I used 3 screws per landscape timber, starting with the second layer up.
- Cordless drill/driver
- Weed Barrier – buy enough to completely cover the ground inside your playground frame.
- Utility Knife – for cutting and trimming the weed barrier.
- DIY backyard playground material – The low-cost option here is chipped wood, but there are some more expensive recycled rubber options such as Swing Set Playground Rubber Mulch 75 Cu.Ft. Pallet-Brick Red. Once again, be sure that you're buying enough material to cover the entire ground up to the depth of your choosing. In my case, I purchased 10 yards of chipped wood playground cover from a local source at $15/yard.
Instructions for your Home Playground:
1. Choose your site and the size of the DIY backyard playground
The first thing you need to do is choose your site. Once you know the location and the size you can finalize and procure your materials list. We settled on a 16′ X 32′ rectangle with an inset 8′ X 8′ sandbox.
Make sure you choose a site that accommodates your playset of choice. You don't want the kiddos flying off the swing and right out of the playground! As far as the location, if you have an option, choose a nice flat site. In our case, the chosen location slopes more than I would have liked and was pretty bumpy. We were set on that space and committed to the additional prep work.
2. Prep the future DIY backyard playground site
As I mentioned above, the location we chose was not very flat. We spent a significant amount of time scraping and leveling the rectangle and honestly I wish I had spent even more time working on leveling. We were able to make it work, but we put a lot of effort into leveling the playset and prepping for the timbers.
3. Position the playset
If you're smarter than me, you did steps 1 and 2 prior to ever building the playset, and just built it in the right location to start! In that case, you can just move on to the next step. If you're on par with me, then now is the time to move your play set into the perfect position.
As you can see in the picture below, we used a chain with the tractor bucket to gently lift the playset and slide it into position. What you're not seeing here is that the playset started on the grass! Make sure you use a level to orient your playset and avoid any leaning.
4. Lay out the ground contact landscape timbers
The next step is to get the ground contact layer of timbers in place to define the perimeter. Make sure you're happy with the position and squareness of the rectangle you're creating. You can use a square to get the corners to approximately a 90-degree angle or go old school math and bust out the Pythagorean theorem to get your corners to a 90-degree angle.
I won't elaborate any more on the second method – if you're an engineer or surveyor you already know what I'm talking about, and if you aren't, then you really don't care! In the name of complete disclosure, for my project, I simply eyeballed squareness and it looks fine.
And of course, there is nothing limiting you to a true rectangle. You can lay out the timbers in whatever pattern you choose. Once you're happy with the shape you can start driving your 7″ pole barn nails. These will keep the bottom layer pinned to the ground and prevent shifting. Now on to the next step.
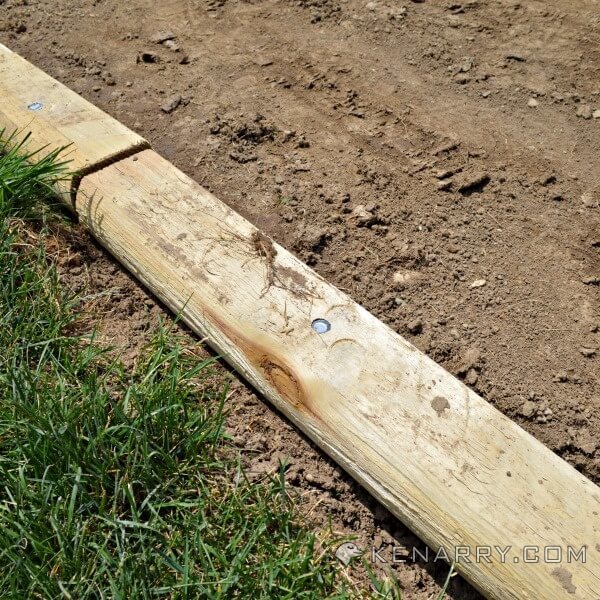
5. Build up the walls
It's up to you whether to put the weed barrier down at this point and pinch it between the bottom timber and the top timber. I started out by pinching but quickly decided to just finish the entire second layer before adding the rest of the ground cover. This is really the quick and easy part, just remember to stagger your timbers so no timber lays entirely on the timber below it. I drove 3 – 5″ screws to secure each timber – one at each end and one in the center. Cut the timbers as necessary.

6. Lay out the weed barrier
This is as simple as it sounds, just start rolling out the weed barrier row by row until all the ground is covered. Use your utility knife to cut each row to the correct length. Make as many slits as necessary to accommodate the play set or any other obstacles in your way. Carrie and I happened to do this on a windy day so we took handfuls of the playground covering to keep the ground cover in place as we rolled it out.
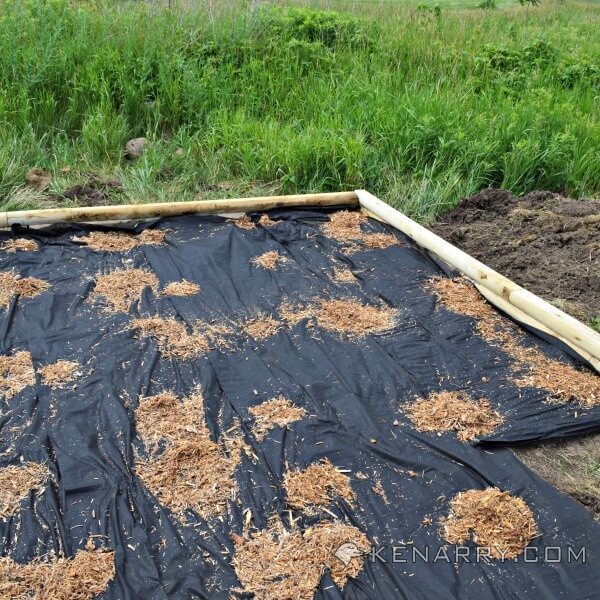
7. Fill with playground covering
Now that you've got the DIY backyard playground framed in it's time to fill it with the ground covering and spread it around!
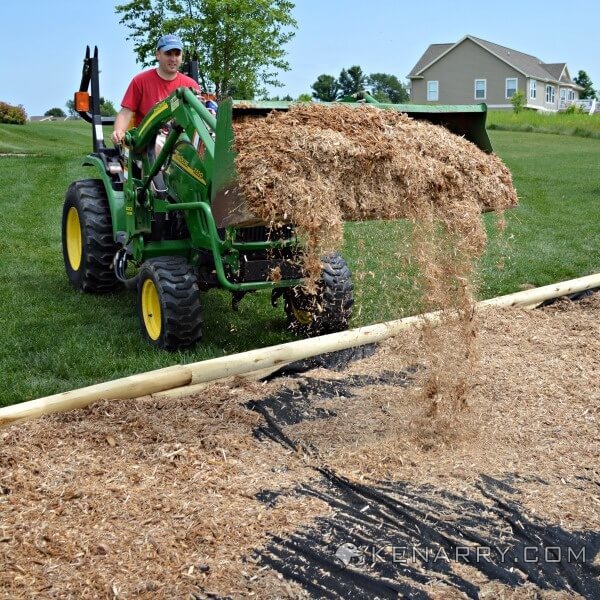
The tractor helped a lot in getting the 10 yards of material moved into the DIY backyard playground area, but final spreading and leveling required some elbow grease from Carrie and me.
8. Trim the weed barrier
If you have any weed barrier showing either inside or outside the DIY backyard playground, now is the time to trim it off with your utility knife.
9. Enjoy
Congratulations, you've just created a park for the kids in your backyard! There's no more mowing under the playset and your kids will now have a cushiony play surface to soften the inevitable tumbles! Just watching those little ones wear themselves out in your personal park will make all the effort worth it!

So there you have it, a DIY Wood Sandbox that turned into an entire backyard playground for your kids! If you'd like to follow other similar DIY projects that Carrie and I work on, please subscribe to Kenarry. If you have any other suggestions or great playground ideas, please leave a comment, I'd love to hear from you!
If you liked this post, please share it with your friends or pin it for later:
Love the ideas you see here on Ideas for the Home by Kenarry®? Subscribe today to get our weeklyIdeas in Your Inboxnewsletter plus other exclusive gifts and offers — all for FREE!
What's Next?
If you enjoyed this project, you might also like these tutorial on the
- DIY Wood Sandbox
- DIY Pond: How to Make a Backyard Oasis with Waterfall
- Fun and Educational Fall Backyard Activities
Originally published August 2014. Updated November 2020.

Kent is responsible for a lot of the behind-the-scenes work on Ideas for the Home by Kenarry® including editing stories, acting as a sounding board and providing technical support. Kent also writes occasionally, usually about technology, home improvement or organization.
By day, Kent is a design engineer and manager for an automotive supplier. In his spare time, he loves researching new tech toys, fishing at our cottage and watching the Seahawks win.
How To Build An Outdoor Play Area
Source: https://www.kenarry.com/diy-backyard-playground/
Posted by: colewitis1985.blogspot.com
0 Response to "How To Build An Outdoor Play Area"
Post a Comment